Adding a new Modul
Only a Modul Administrator (apart from root) is able to add new Modules to the Electure-Portal. Currently it is only possible to add Modules (might also be called courses or lectures) that are listed in the external Sync-System (currently LSF). Therefore if a Modul is not listed in the external Sync-System you can't add it. There are plans to change this in future versions.
To add a Modul click on „Add new Modul“  in the Electureslibrary Portlet on the main page (Welcome, /web/guest/home). You will be presented a form like the one below:
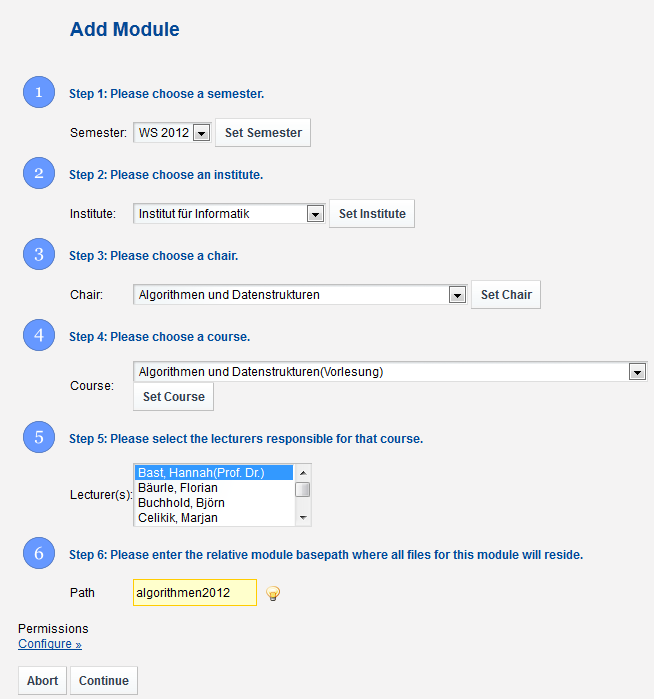
Form to add a new Modul.
You should simply follow the numbered steps to add a Modul:
- Choose a Semester (the current semester should be chosen by default) and click on set semester .
- Choose an institute and click on set institute . If the needed institute is not in the list, it should be added in the ElectureslibraryAdmin portlet before adding a modul.
- Choose a chair which belongs to the selected institute and click on set chair . If the needed chair is not in the list, it does not yet exist in the database and should be added in the ElectureslibraryAdmin portlet before adding a modul or it does not belong to the selected institute.
- Choose a course from the list and click on set course. Note that if your module name is longer than 75 chars (including the semester) the name of the corresponding group for this module will be shortened so that it fits 75 chars. Additionaly it will then contain a random 5-digit number. An example: the group name for the module „BioMST 1: Biotechnologische Aufgabenstellungen für die Mikrosystemtechnik“ in wintersemester 2008/2009 will for example be „BioMST 1 Biotechnologische Aufgabenstellungen fuer die M 10857 WS 20082009“.
- Select lecturers from the list. Make sure that you only select those lecturers that are assigned to the current course in the external system. The system will complain if you choose others. The list contains all lecturers belonging to the selected chair. To add Lecturers that are not assigned to the course in the external Sync-System you can edit the Modul lateron.
- Important: Choose this path very carefully, as it cannot be changed afterwards. Enter the relative path in the file system where all the files for this modul will be stored. Do NOT include the semester, as it will automatically be appended. The specified path will be created in the file system if it doesn't exist.
- As a last step make sure to set the permissions correctly. The default permissions are set so that everybody can see all chapters and electures (this does not mean that he is able to download all the files, he is just able to see all available materials). The default settings should usually not be changed. If you still want to set special permissions, you can click on „Configure“
 to be able to set the permissions. You should now see checkboxes for the VIEW permission (this permissions allows users to see the contents). If you need to set more permissions (this is usually NOT the case!), you can click on „More“
 to see all possible permissions for the three roles Community, Student and Guest.
  Usually everyone should be able to VIEW everything but nobody should be able to UPDATE , DELETE the modul or be able to change the permissions ( PERMISSIONS ). The different roles and the community are explained at the beginning of this chapter. Be aware of the fact that if you give the Guest role permissions, you enable everyone to perform the actions associated with these permissions.
After clicking on continue, your new modul will be added to the list.